ROOF WORKSHOP / FULL BLOCKS
Plan my roofA practical minecraft roof generator for builders
01 / minecraft roof generator workbench
Generate the complete covering and inspect its occupied layers.
Full-block roof
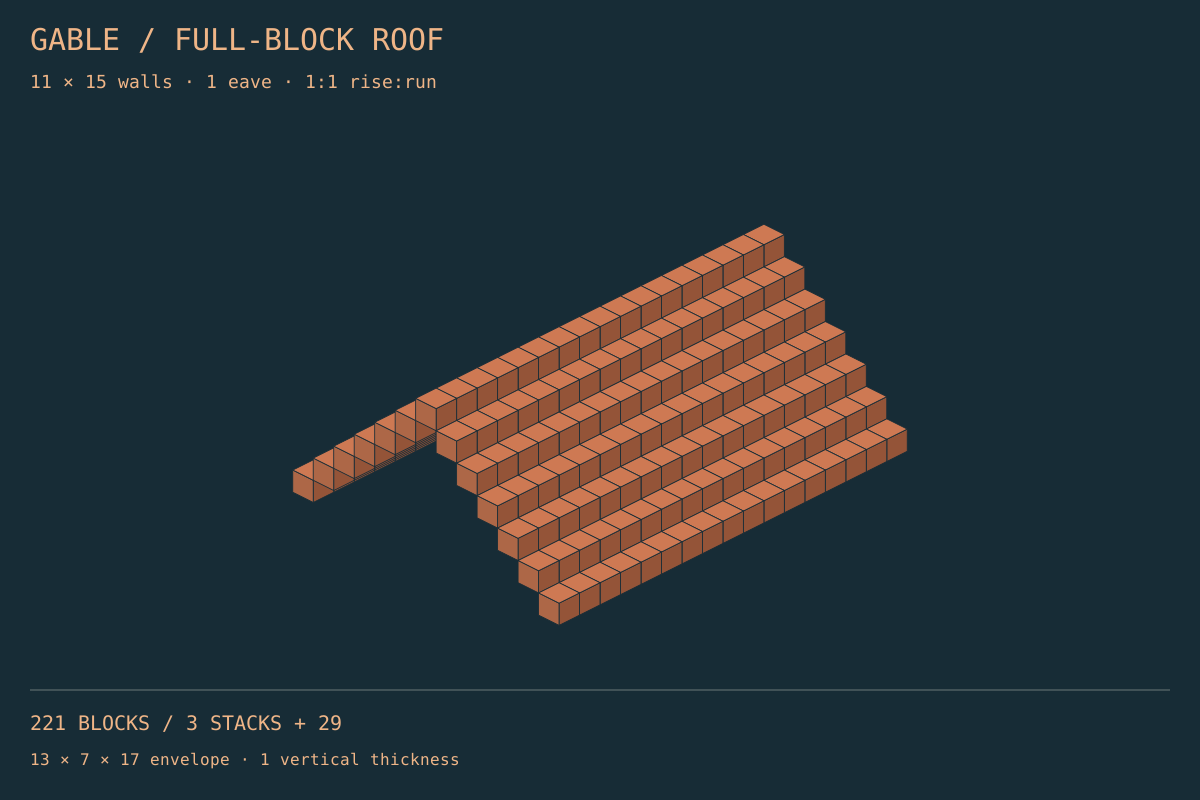
Total blocks
221Stacks of 64
3Loose blocks
29Roof dimensions
13×7×17Roof preview
Coordinates: -1, 64, -1 · minecraft:terracotta
Complete 3D roof of full blocks, including air inside its bounding box. Litematic v6 / Java 1.20.4 data format; requires a compatible Litematica mod version. Game import has not been tested.
The file starts at relative (0, 0, 0), without world offsets. Set the placement origin to the roof’s world minimum corner: X=-1, Y=64, Z=-1. This is the base, not the selected layer.
Coordinates
X=-1 · Y=64 · Z=-1
| Z row | X start | X end | Blocks |
|---|---|---|---|
| -1 | -1 | -1 | 1 |
| -1 | 11 | 11 | 1 |
| 0 | -1 | -1 | 1 |
| 0 | 11 | 11 | 1 |
| 1 | -1 | -1 | 1 |
| 1 | 11 | 11 | 1 |
| 2 | -1 | -1 | 1 |
| 2 | 11 | 11 | 1 |
| 3 | -1 | -1 | 1 |
| 3 | 11 | 11 | 1 |
| 4 | -1 | -1 | 1 |
| 4 | 11 | 11 | 1 |
| 5 | -1 | -1 | 1 |
| 5 | 11 | 11 | 1 |
| 6 | -1 | -1 | 1 |
| 6 | 11 | 11 | 1 |
| 7 | -1 | -1 | 1 |
| 7 | 11 | 11 | 1 |
| 8 | -1 | -1 | 1 |
| 8 | 11 | 11 | 1 |
| 9 | -1 | -1 | 1 |
| 9 | 11 | 11 | 1 |
| 10 | -1 | -1 | 1 |
| 10 | 11 | 11 | 1 |
| 11 | -1 | -1 | 1 |
| 11 | 11 | 11 | 1 |
| 12 | -1 | -1 | 1 |
| 12 | 11 | 11 | 1 |
| 13 | -1 | -1 | 1 |
| 13 | 11 | 11 | 1 |
| 14 | -1 | -1 | 1 |
| 14 | 11 | 11 | 1 |
| 15 | -1 | -1 | 1 |
| 15 | 11 | 11 | 1 |
Gable · hip · shed · exact layer plans
Both illustrations come from generated roof cells. They are planning views, not screenshots from a Minecraft world.
Plan my roofMEASURE THE BUILDING
Four steps from wall measurements to roof rows
Apply edited settings to replace the current result.
📐 Measure the walls
Enter outside wall width and depth. Choose the eaves separately; do not add them twice.
🏠 Set the roof profile
Select gable, hip or shed. Run sets horizontal blocks per rise. Apply your settings to regenerate.
🔎 Inspect from several directions
Compare isometric, front and Y layer views. Inspect selected cells, toggle the grid and zoom before copying coordinates.
📦 Take the plan to the build
Export CSV/JSON coordinates, the current SVG view, or the complete roof as .litematic. Check the placement origin before using the blueprint.
A complete covering
What this minecraft roof generator measures
🏡 Three roofs with different edges
Gables rise from opposite sides, hips from four edges and sheds in one direction. Changing form changes occupied positions, not merely a label.
📏 Eaves around a real footprint
A one-block overhang adds two blocks to both roof width and depth. Small eaves changes can noticeably alter the material list.
🧱 Thickness with honest materials
Thickness stacks full blocks vertically above the stepped underside, increasing the roof height. Quantities describe complete cubes, not stairs, slabs or crafting recipes.
A useful quantity check
Read the roof total before gathering blocks.
Before placing blocks
Three details worth checking before construction
The wall origin is not the roof corner
The reference is the northwest wall corner at the eave underside. Overhang reaches beyond it. Moving this origin shifts coordinates without changing quantities.
A wider run makes a gentler slope
Run measures horizontal blocks per rise, not degrees. Larger values create broader terraces. Check the limited headroom under shallow roofs on narrow buildings.
A roof shell is not a finished house
Walls, gable infill, gutters and decoration are excluded. At thickness one, adjacent steps can touch only along edges. Temporary placement supports may be needed and are not counted.
Profile versus footprint
Choose a roof plan rather than a repeated picture
Choose the output that matches your building task.
Front profile
This minecraft roof generator includes depth and all occupied roof positions.
A two-dimensional profile explains the slope but leaves length and end treatment to you.
Generic solid
The roof follows a rectangular wall footprint with an explicit overhang.
A cone or prism serves another structural purpose and does not automatically become a house covering.
Automatic placement
Readable coordinates and images support deliberate manual construction.
An in-game importer or command system needs its own format and permissions; these exports do not execute.
Check the quantities
Two reproducible roof states, not invented popularity
The default gable uses eleven by fifteen wall blocks, one block of overhang, run one and thickness one. Its covering measures thirteen by seventeen, reaches seven layers and contains 221 blocks.
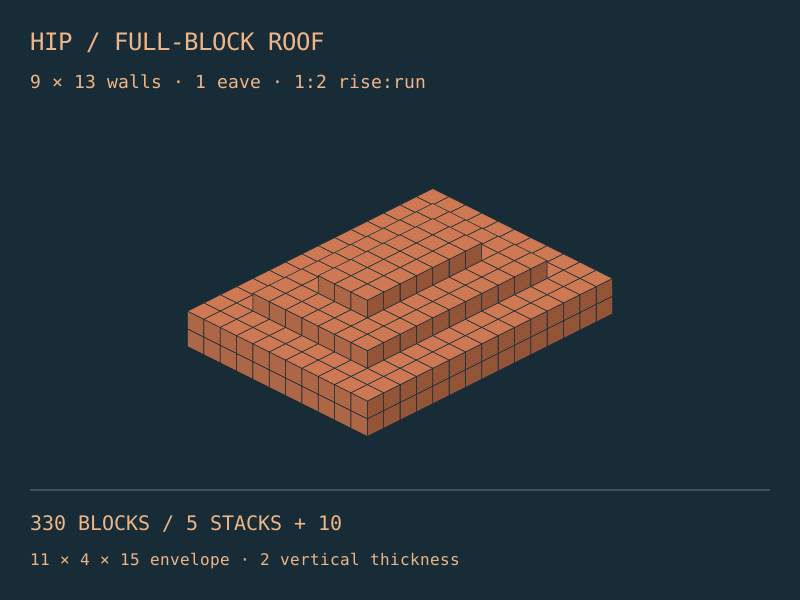
Change to a hip over nine by thirteen walls, keep one-block eaves, set run two and thickness two. The result spans eleven by fifteen, reaches four layers and uses 330 blocks. These are geometry examples, not survival inventory readings.
Keep other construction jobs in their own tools
Use this minecraft roof generator for coverings; switch when the structure itself changes.
Questions about eaves, slopes and exports
Does this create stairs or slabs?
No. Full-block roof positions use complete cubes. Decorative stair placement has directional states and needs a different material plan.
Which dimension follows the ridge?
For the gable, the ridge runs along building depth. The width controls the cross-section. Swap wall dimensions if your building faces the other direction.
Why is the exported corner outside my walls?
Eaves extend beyond the wall footprint. Negative local coordinates are expected when an overhang is present; check the wall-origin reference instead of deleting those rows.
Can I download an automatic build?
CSV/JSON describe world coordinates; SVG shows the selected view. The .litematic file contains the complete full-block roof at a relative origin, including air in its bounding box. It requires compatible Litematica; game import is untested. Downloading never changes a world.
Are material totals a shopping list?
The total covers this roof only. Subtract reusable blocks and add walls, trim and supports yourself. The browser cannot read inventory.
Measure once, inspect each roof level
Try the minecraft roof generator with your actual walls. Check the front silhouette and the lowest layer before collecting materials.
Plan my roofIndependent planning tool, not affiliated with Mojang or Microsoft.